Friday, August 2, 2013

A Mad Scientist Birthday Party

It's not everyday that one comes across a Mad Scientist birthday party, yet alone one, for a 7 year old girl! So when I got a call from the Event Stylist, I was super excited! They are the talented bunch from Mint Events and Soirees who create fantastic tablescapes and styling for any event. Do check out their work and be prepared to be in awe of the great detail, these girls are capable of.

The brief was something crazy with brains, test tubes, and mad experiments. I had the creative freedom to create a wild cake with a good-sized budget. And boy, was I up for the challenge! 

As per usual, I trawled the internet for ideas and Googled "Mad Scientist cake, Mad Scientist Party, Brains cake", to name a few. Most of the cakes were of beakers and test tubes and nerdy glasses. Nothing caught my eye. 

So I had to come up with something totally original. I wanted the kids to scream with delight when they saw the cake! 

The feature of the cake would be the brains. And not just any brains. This would be the brains that the Mad Scientist was working on. And something completely twisted happened in his laboratory, and the brains sprouted one oozing, bleeding eye. The brains would then be connected to a "Brain 'o' meter, which was a black box, complete with dials and meter reading, and connecting wires. Behind this experiment, was a bubbling beaker, filled with green liquid and bubbles, and the liquid was pouring out from a suspended test tube.

It was a great plan, genius, I might add :) I was so excited about this project. Work began immediately after I got client approval, and I began making the test tube and bubbling beaker. This would be the only part of the cake which was non-edible. It was so much fun! By the end of the day, it was complete. It looked really good for my first attempt! Because of its size, if it were to be edible, the beaker could be cake, but the test tube must be styrofoam. It'll be too narrow to make it out of cake.


The carving of the brains itself took a little longer than expected. But once that was done, it was just a matter of covering a thin layer of light coral icing over it, then making all the squiggly bits (I don't know what the medical term for this is :)). Thin, long sausages were rolled and then positioned in coils all over. It was quite therapeutic. Bit by bit, the brains got covered and soon, it started to look quite gory. 

I added splotches of red here and there to make it look like it had been cut out fresh, from a human skull moment ago. Then it was glistened with cold mirror gel to make it look even more realistic.


Left side all done

I freaked myself out!
The Brain 'o' meter was created by compiling a few different photos of "scientific meters", that I found on the internet. I decided to make it slightly tilted, instead of flat. This would make it look more realistic. The dials and knobs were all made from gumpaste and then painted with silver lustre dust.


Finally, the last stage was putting it all together. This was the easy part, since all the components were ready. I mounted the beaker on a black platform, to give it extra height. Then connected the brains to the Brain 'o' meter with 28 gauge wire and suction caps. The last touch was to make the brain look bloody. So I coloured piping gel with red food dye, and squirted it around the brains.


I was told after that the kids were squealing when they saw the cake! It did the job, alright!

You can check out the pics from this Mad Scientist party by Mint Events here

Alternatively, you can view more pics on my Facebook page Miss Shortcakes 

Thanks for reading! 
xx 

Monday, June 24, 2013

Cakes for Hantaran or Malay Wedding Gifts

I was living and working in Sydney for 12 years, and having moved back to Kuala Lumpur, there have been a lot of cultural factors that I have to adjust to, even through my cakes.

Here in Malaysia, there are 3 main cultures - the Malays, Chinese, and Indian. The majority of Muslims are from the Malay background and when they get married, it is held over a course of a few days, with different ceremonies. Part of their wedding tradition is to give out wedding gifts, or otherwise known as "Hantaran", during the solemnization.

Both the bride and the groom have to present their future in-laws with trays adorned with gifts. And there are specific items to go on each tray, and also a specific number of trays from the bride and from the groom. Where I fit into this, is in the "Sweets" category. There must be one tray filled with sweets, and this can be in a form of a cake, cookies, chocolates or traditional sweets.

I get a lot of requests for Hantaran cakes, and I thought I'd put together a post, just on these cakes alone. The Hantaran cakes must have these criteria:

1. Petite (usually sized according to the tray that is being used)
2. Lightweight (the tray bearer must be able to carry it without difficulty for a short period of time)
3. Long lasting
4. Sugar flowers (this is quite a popular request)


Here are a few of my cakes, perfect as a Hantaran.


An example of one of my cakes, on a tray, ready to be presented.
This was a 5" styrofoam top tier, and 7" double tiers, in real cake. The styrofoam tier was to make the cake taller, but with less weight.

This was originally for a birthday, but I think without the inscription on the top, it would make a lovely Hantaran cake.
A small tier looks great on a tray, but I always recommend that one of the tiers is a styrofoam tier.
A stylish tailored striped cake with a pretty lace stencil on the bottom.


This can be done shorter for better stability, but still I would have a styrofoam top tier.
Something very contemporary, instead of the usual suspects of white and pink. This was silver shimmered icing with burgundy Magnolias.

Do have a look on my Facebook page Miss Shortcakes in the Wedding Album for more inspiration for your Hantaran cake.

Thanks for stopping by!


Monday, May 13, 2013

My Mother's Day Weekend (May 11-12, 2013)

This year, my Mother's Day was really special. What made my day, was when my 2 year and a half year old, hopped onto my lap, and blurted out, "I Wuv You, Mummy", without any of prompting.

Instantly, I turned to mush. This is what makes motherhood all worthwhile. 

2 days before Mother's Day, my dear sister came over, armed with glitter glue, coloured paper, stickers, and scrapbooking trinkets. She was going to teach little J, how to make Mother's Day cards for my Mum and I. 

Little J was thrilled, and spent an entire 2 and half hours, painstakingly attaching all the little trinkets, colouring, glueing glitter and stickers, onto these home made cards.

He was so cute and had also practiced how to hand them over, while wishing us, "Happy Mother's Day", with his bashful smile.

All done!
I really need to concentrate. Shh!

At lunch, presenting Mum and I, our Mother's Day cards


The day before Mother's Day, I had a little cake stand, at the Mother's Day Bazaar organised by the Baby Jumper Gym Publika. I brought along a few new cake designs and I also had some cupcakes to sell. It was fun to get out and do a little PR work for Miss Shortcakes. The afternoon was spent chatting to people about what I do, and how the cakes get transformed into something really special.

My new designs, which I created specially for this event.


Little J, holding on very tightly to my Miss Shortcakes balloon

A very special thank you goes out to my sister, who helped me the entire day at Publika, my Dad who helped me with the cupcake boxes, Izreen and Aunty Farida who lent me the decorative items, and my Mum, of course, for helping me with Little J! Oh, and not forgetting the ladies at BJG who organised the event for us, Mummies with small businesses!


Monday, May 6, 2013

The Elusive Turkish Birthday cake

Ok here it is. After weeks of trawling the internet for Turkish-themed cakes, I found nothing. The fact of the matter is, I've searched for Turkish birthday cakes, Turkish wedding cakes, Turkish cakes, Turkish cake design, Turkish this Turkish that, and got extremely frustrated.

All that came up were a bunch of nutty, syrupy, spiced cakes. And nada for custom designed cakes.

But, if you type in Moroccan cakes or Arabic cakes, bang! Dozens of photos of colourful and gold embellished cakes suddenly pop up.

So I decided, that since there weren't many Turkish-themed cakes out there on the internet, I, Miss Shortcakes will be the first one to post a proper Turkish-themed cake on the internet.

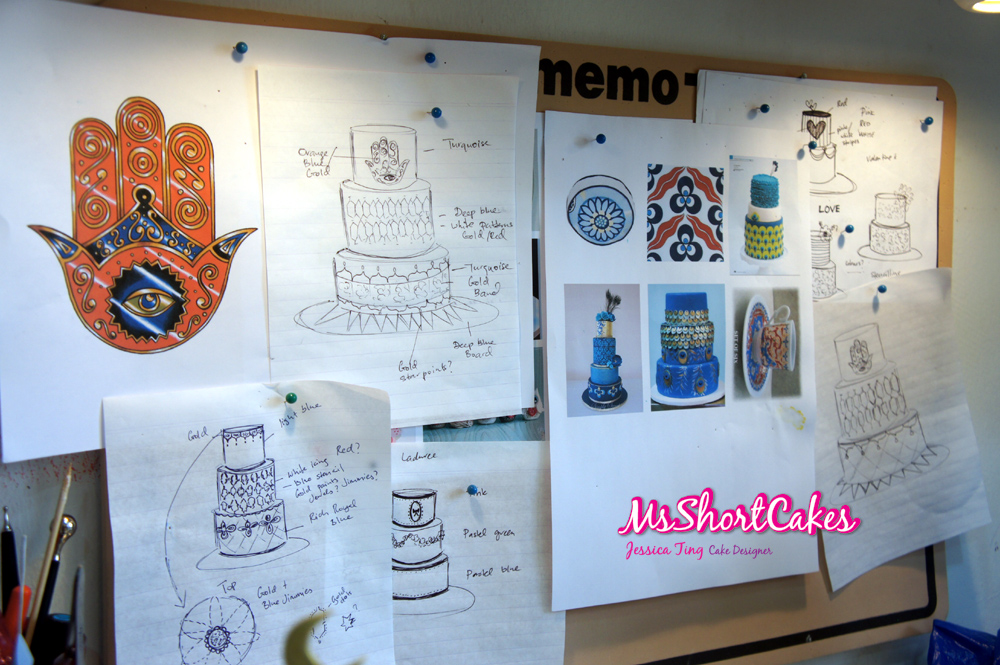
To get the ball rolling, I started with research on the fabrics and textiles of the Turkish culture to get ideas. And when I typed in Turkish tiles, most of the results showed me blue, white, and red geometric patterns with touches of floral motifs. The fabrics on the other hand, were generally Persian looking, with rich, deep colours and ornate scrollwork. Choosing the fabric as part of my design, could possibly end up in making my Turkish cake look Arabic.

I had to very careful to not do this, as the recepient of the cake was a very particular woman. She had travelled to Istanbul to purchase the decorative items for her birthday party. So under no circumstance, could I turn up with an Arabic or Moroccan cake!

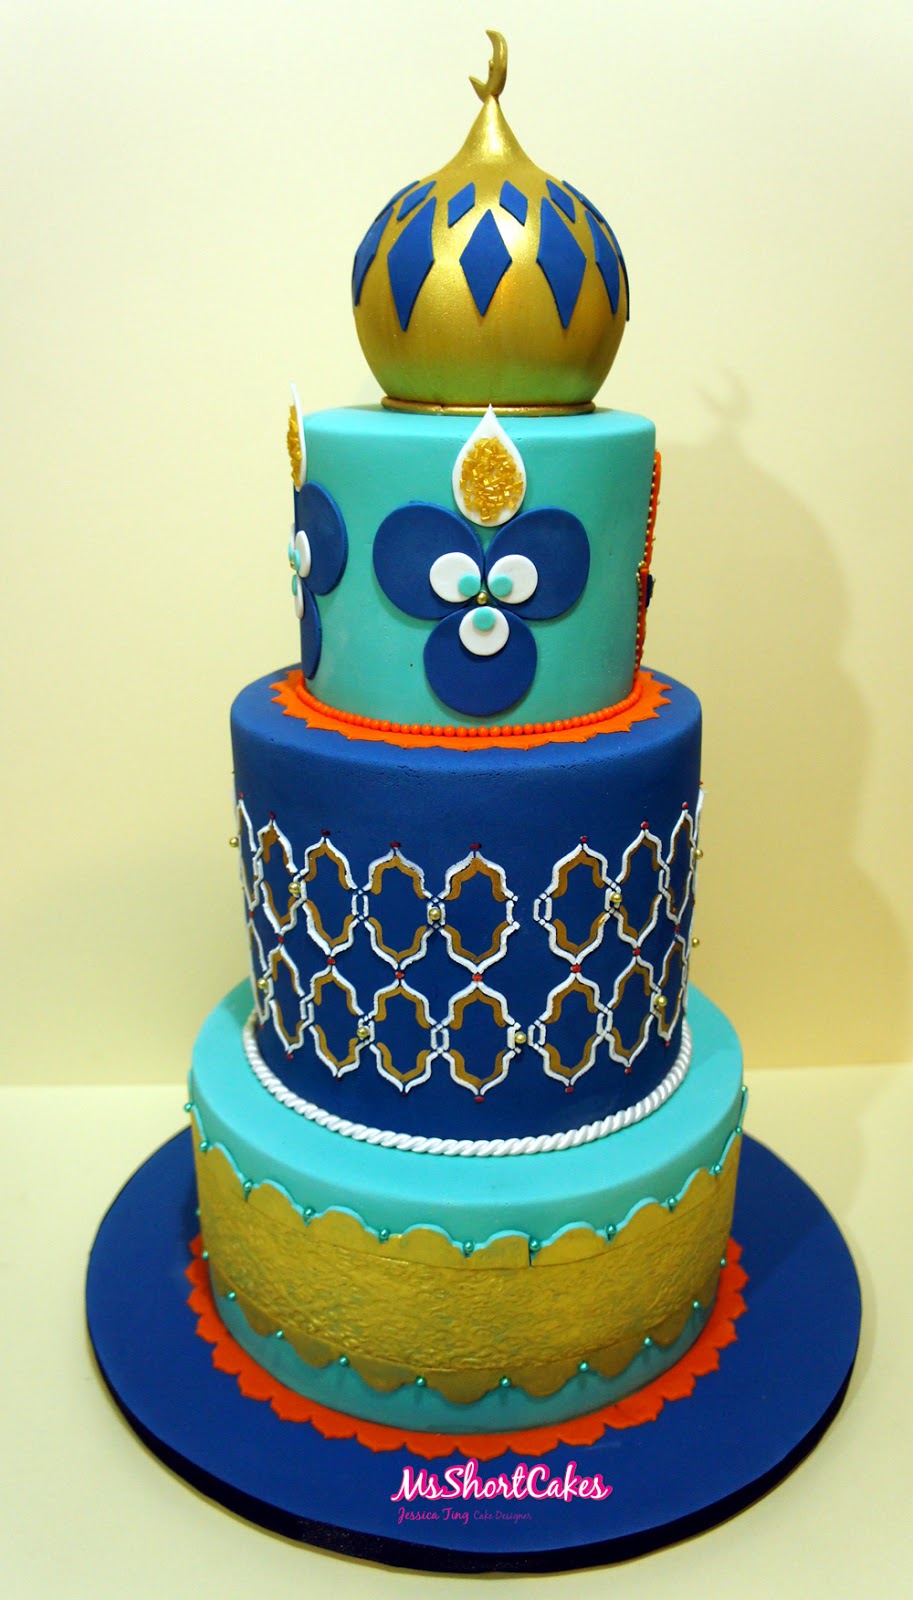
Using the Turkish tiles as inspiration and the colours of blue, aqua, white, red, and gold, I knew I couldn't go wrong. I initially came up with a different design to this one, but with either one, I think I did the Turks proud :)

 
Mood board with various sketches and pictures
Gold minaret topper. I love how the gold lustre came up. I mixed Antique Gold, Radiant Gold and Light Gold to achieve this colour.


Ganached and ready to be iced

Once all the hard work was done (ganaching and icing), the fun part was putting it all together. I couldn't wait to start decorating!


The Hand of Fatima, a must for the cake, in orange.


The Evil Eye. It had to be done.

I love the blue diamonds on the minaret. A last minute decision, but a good one.
Once the cakes were baked, ganached, and iced, I must have spent a solid 7 hours, JUST on decorating alone.

Baking time : 2 and a half hours (5" x 2, 7" x 3, 9" x 2)
Ganaching and torting : 1 and a half hours
Icing time : 1 hour 
Decorating time : 7 hours, straight.
Miscellaneous prep time : 2 hours

That's 14 hours that I can account for, spread over a period of 3 days of actual production.

The time that I've spent doing research, designing and sketching, and communicating with the client, prior to production, that I can't account for.


So there you have it. If you're looking for inspiration for a Turkish-themed cake, I hope I have done just that. Not a jewel in sight, a red Persian carpet, or an Aladdin magic lamp :p

You can also follow me on Facebook for more updates on my latest cake adventures www.facebook.com/msshortcakes
Or, find me on Instagram under "missshortcakes".

Hope to see you there! xx

Sunday, May 5, 2013

If You Only Had One Night in Bangkok.

Seriously. One night in Bangkok is enough to change your life.
I'm not talking about anything dirty or illegal. And I'm certainly not talking about anything spiritual.

I'm talking about food, and finding THE best Thai seafood meal you will EVER have in your life. This is no joke. The very first bite I had was truly amazing.
She had lived up to all the reviews on various blogs I had read.

She is Jay Fai, a woman in her late 60's or early 70's, by the looks of it. She cooks every single dish, single handedly.

The restaurant was not easy to find, which is the only negative thing I have to say about it. My experience in Bangkok was that 90% of cab drivers did not know where they were going. And finding Raan Jay Fai, was a mission in itself - to get a cabbie to drive us there, cost triple of what it would have usually cost from Silom. 

I tried to prepare myself for the trek to get there by getting the address written down in Thai, and had also printed a map in Thai for the taxi driver. Still, to no avail. No one apparently knew how to get there. Finally, after getting a taxi driver to ring the restaurant, we got directions.

Then it was time to flag another taxi who was willing to drive us there.

After 48 hours of negotiating with taxis from all corners of Bangkok, my friends and I, had had, enough. We just wanted to get to Jay Fai's to eat. We paid the 200 baht and hauled ourselves into the next cab. 


Jay Fai is situated alongside a very busy road of local shops and restaurants. It took approximately 20 minutes to get there from Silom. One look at the shopfront, and immediately I saw Jay Fai, standing in front of her wok station, looking totally calm and collected, despite the roaring flames from the woks. 

Prep kitchen

Jay Fai in action

By the time we arrived there, it was pretty late - 10.30pm, I'd say, so we got a table fast. I heard that if you get there around 6-ish, you'd need to queue.

We ordered the "must-haves" which were the Crab Omelette and Drunken Noodles. The omelette on it's own was 800 baht. Yup, that's almost RM80 for an omelette. Not cheap, but if it lived up to it's reputation, we were in for a treat.

I've stolen a few pics from my mate's phone (he takes awesome pics),
I hope he doesn't mind :)
 
Look at those CHUNKS of crab meat in there, perfectly cooked.


So so SO good, especially with the chill dipping sauce.

Can't wait. Must. Dig in. Now.

Crispy skin on the outside, and juicy on the inside. This was a winner, and worth the 800 baht.
This omelette was packed with huge chunks of sweet crab. I mean, it was practically bursting with crab. I've never had an omelette like this in my life, and kudos to Jay Fai, for coming up with something so simple, and yet so damn special.

This was my star of the night.

My other mate, thought the Drunken Noodles was the killer dish. And, it was oh so good too! The noodles were silky and slippery, and the seafood in the dish was just supremely fresh and of restaurant quality. She must have the top providores for seafood in the country! 


Drunken Noodles

Drunken Noodles 2
I loved how the rice noodles weren't cut, and they were fried in sheets. It gave the dish a little bit of a difference that way. These noodles were cooked to perfection. The flavour was second to none from that wok. And the seafood selection - mutant sized prawns, squid, and huge chunks of that sweet, sweet crab, laced the entire plate. It was like eating seafood with a side of noodles.

Then we also ordered a seafood salad, and this was at market price. 

Oh, but who cares? It was so bloody good, I would have given a leg. 


Seafood Salad

Seafood salad 2

Here we were presented with a mountain of the freshest seafood, dressed in a beautifully balanced dressing of lime juice, fish sauce, and chilli. I love Thai Seafood Salad, and I always judge the quality of a Thai restaurant with this dish.

The seafood was perfectly blanched and it had just the right balance of sourness, sweetness, and spice. It was divine.

By this time, I was almost "seafooded" out. The huge portions and quality of the seafood in each dish, was almost making me drunk. I was happily delirious.

But wait, we ordered another noodle dish. Flat rice noodles with wait for it, more seafood.

The damage at the end of the night - 2600 Baht with beer, for 3 people.
It was definitely worth the price, and if you only had one night in Bangkok, I'd go here. 

Forget the tiger show.


Check out the prawns and squid, and of course there's crab too in this.


Raan Jay Fai
327 Thalon Mahachai, 
02-223-9384


I would definitely get the taxi driver to ring the restaurant and get directions. That was much easier, then giving the address to the cabbie.


Friday, April 26, 2013

Every Cake Tells a Story.

This week, I had the pleasure of creating 2 birthday cakes, for 2 very different women. It's always interesting to hear the client explain their requirements for the cake, and to hear them describe their friend or whoever it is, they are ordering the cake for.

The first cake was for someone turning 40, who had many, many loves. She was very much into her family, skiing, fine coffee, music, and most of all - Yoga and handbags.

Not just any handbags, mind you. It was a Birkin. And the other, an Olympia Le-Tan clutch book bag. Both, very unique in their own right, and both with celeb status.

Needless to say, the person ordering the cake for her, also had a very clear picture of what she wanted the cake look like. I racked my brain for over 2 weeks, trying to accomodate all her requests, and all the little details she had specified.

Finally, after many conversations over Whatsapp (oh, what would I do without you?), we concluded on a cake with yoga silhouettes (they had to be Ashtanga, or nothing else!), the Birkin, the OLT clutch, a Hermes scarf, and I was also going to add a pair of skis as well, on top of the cake. Finished with a ribbon and a single sugar flower.

I think it must have been about 4 days before the cake was due, when I receive a Whatsapp message at 11.30pm. It was from my client. She was at the first birthday bash for her yoga-loving friend that night, and there was a cake there too.

Not just any cake. This cake was 3 tiers, with a figurine on top, in a sitting yoga pose, surrounded by a Birkin, yoga mats, and flowers. Around the cake ALSO had yoga silhouettes.

She was FUMING. I was in DISBELIEF. 

Ok ok, what do I do? 

Keep calm. Think. Of. New. Cake.

So I immediately reassured her, that it's all good. We'll come up with a different idea in the morning, and that I would be in touch.

Sunday afternoon comes, and we are in touch again about the cake. I suggest we move completely away from the yoga/bag theme, and do what I do best, which is something pretty with gorgeous, sugar flowers. 

"Let's do that. All girls would love a pretty, floral cake."

Unfortunately, the birthday girl is all about the yoga. So the cake needs to go ahead with the yoga theme. We finally decide that we will make the Olympia Le-Tan clutch the star of the cake, with a scarf spilling out of it. The yoga silhouettes, are to stay, and I need to make sure they are SPECIFIC Ashtanga poses. Not quite like the other cake, she had seen over the weekend.
 

By the time I was half way through the cake, I knew I had a winner of a cake on my hands. Every element turned out great, even though I had to forego the sugar flower, and I was very happy with the end result. It was classy, elegant, and most of all, it depicted what the birthday girl was about. This was most important to the client, and that is what makes a successful cake.


The other custom designed cake I had this week, was for a doctor who loved shoes and bags. The cake was ordered by a regular client of mine, for her very good doctor friend. 

She initially sent me the photo of a stack of Chanel boy bags, and from there we changed the stack of bags, into a stack of medical books. She also wanted a shoe on the books, and a stethescope draped over it.

We discussed colours and what would work best. She was so open to any suggestions I had, and I love when clients say, "You know what works best. I'll go with whatever you think".

Aaaah....that's bliss to my cake designer ears. 

It gives me full confidence to push ahead with my ideas, with that creative freedom. 

I chose to do vintage medical books with gold trims and detailing, to match the black bag and gold shoe. I love how everything came together, and I think once the cakes were ganached, it took about 5 hours to ice and finish the cake off. 

I had most fun putting this cake together and when I posted the work in progress pic on Instagram and FB, it created a stir! More so, when my client posted it on her Instagram account, it went off the charts! She really generated a LOT of interest to my business from all possible means of communication. It's been unreal.

If you are reading this blog post, thank you SO much for supporting my business. You can also follow me on Facebook by clicking this link www.facebook.com/msshortcakes

xxx Miss Shortcakes


Tuesday, April 2, 2013

Up close and personal with Faye Cahill

As soon as the Galloping Gus course was over, the next course was a 2 day private workshop at Faye Cahill Cake Design, in Marrickville. If I had to choose my all-time favourite cake designer in Sydney, hands down, it would be Faye Cahill.

I absolutely love her style and designs, using cutting edge techniques and delicate artwork. The private workshop was completely tailored around what I wanted to learn! I couldn't have been happier to do it, even though I was quite tired from the Galloping Gus course :(

Faye and I worked on the course details together via email and we came up with a good game plan. I wanted some fine tuning and polishing on some ganaching and icing techniques (skills which form the most important part of the cake), as well as, learn how to pipe intricate lace and edible beading. She got me to look for patterns on the internet, which would translate well onto cake, and in particular our design.

Shop front


When I arrived at 9.30 a.m., I was greeted by Mav, the senior cake decorator, who was going to be my instructor for the first session. Mav has been with Faye for 5 years, and started there doing work experience. 

Mav made me feel very welcome from the moment I stepped foot into the studio. My notes were laid out, along with my chocolate cake, ganache was ready, and all the tools required were kept neatly in a little basket on my work area. I even had a little packet of popcorn to nibble on :).

We began with the basics - ganaching and torting. The cake that I was working on was a 7" round, and it was going to be 26cm tall. Mav was very good in explaining how the support system would work with a tall, 2 tiered cake.

We ganached and torted for a good couple of hours. By the time our cakes were ready to be iced, it was almost lunch time. I must say, I did pick up some new tips and tricks on how to ganache properly. Skills which I will use with each and every cake that I ganache from now on. 

After lunch, it was time to ice the cake. Icing a tall cyclinder is not an easy job, hence the request by myself. Faye's studio was kept at a cool 18 degrees, and it was perfect conditions for cake decorating. The icing was firm and the ganache set beautifully hard. If only I had those conditions here in KL, life would be so much easier (and faster!).

Mav demonstrated on her cake first, and she did a marvelous job. Once she was done, it was my turn. The icing was firm, and so easy to roll - a far cry from what I work with in KL. I knew I wasn't going to have any trouble with it the moment I rolled it out. I draped it over the top and began easing it down the cyclinder. Slowly, slowly, the icing covered the cake and then I had to make a long, straight slit down the cake, to create a seam. This would prevent it from tearing and would be the easiest way to remove the excess of the cake.

Mav assisted me when it came to this section, and together we finished it. Once the icing was on, it was time to smooth the cake, and to get those razor sharp edges. Again, this was another skill I had wanted to perfect. Mav showed me that it just a slight adjustment with my smoothers and it made a world of difference! 

Happy days!

I think I must have spent at least 20 minutes just smoothing the icing and getting those edges sharp. Then it was time to pearl lustre the cake. A beautiful finish to the ivory icing. I chose a champagne colour and Mav mixed up the colours and demonstrated how it was done. 

Then it was time to mark the cake, for the edible beading. Faye had already prepared a template and this would help with the positioning of the beading.

I marked it carefully with Mav's guidance and it was such an easy method! Then we covered the board with icing and that was it for day one. 

The next day, it was decorating day with Faye Cahill herself. I walked in at 9.30pm and the studio was in full swing already. There were numerous cakes being cut and ganached, flowers being made, it was busy, busy, busy.

Faye had set up all the equipment required and we talked about our design. She explained what we had to do first and showed me the different decorations that we could use.

I had my eye on the edible beading the moment I saw it, and was keen to learn how it was done. Mind you, I was so wrong when I tried to guess what it was! It'll be unfair to myself if I shared with you what we did, so all I can say is that, it took 2 and a half, back breaking hours to create that look that I wanted. And it was only on a 7" cake! By the time I was done, my eyes were sore and my back needed alignment :). 

We worked on applying the silver leaf after that, and that in itself was a delicate operation. It would take lots of practice with the silver leaf, before I could get it all on without tearing. 

Finally, it last job - the piping. Faye is known for her piping skills and it she does a lot of it. She piped the first few goes for me, and it looked so easy when she did it. I struggle when it comes to piping on a vertical surface. I'm more used to piping on a flat surface. It's a lot easier for me to control the piping bag.

So the practice I got there, and the tips I picked up with Faye, were very helpful and made a lot of sense too.

I was doing it the hard way all this while! 


The finished cake

Edible beading and piping work


From the left : Mav, Faye, and myself

Me and my cake :)

 
Unfortunately Faye doesn't allow work-in-progress shots anymore in her studio. This is due to some students taking step-by-step shots, and posting them online. It really defeats the purpose of paying a lot of money for a class with Faye, and then someone on the internet could easily pick up how it's done, for free! So fair enough - I could only snap a few when the cake was complete.

I kept my wedding cake and Gus cake for approximately 2 weeks, just so I could admire them everyday :). When the time came to leave Sydney, I had to painfully take them apart. All I have left is this blog and a bunch of photos, but the skills I've gained, with last me a lifetime.

Time for more big cake adventures!