Monday, April 30, 2012

What would we do without Mothercare?

For the last 40 odd years, Mothercare has been providing mums-to-be and mums around the world, with everything and anything we need to ensure our babies are well looked after, from the minute they are born, right up to 8 years old.

My mother was a keen Mothercare fan in the 70's when her kids were born. Back then, Mothercare was only available to Malaysians via catalog. Which means mum had to select what she wanted through a catalog, then mail her order direct to Mothercare in the UK. 

She'd wait patiently for her goodies to arrive, but my Dad was not so keen (hahaha he was the one sending cheques every month!). She still remembers opening her packages with glee and oohing and aahing at the quality of the clothes. So much so, when my turn came almost 2 years ago to have a little one of my own, I was thrilled to pay them a visit in one of the KL stores! I could finally go check out what my mum had been raving about!

Everytime we'd go shopping for baby stuff, my mum would say, "when you all were babies, you were all in Mothercare, you know." So off we went to Mothercare to buy this and that for my little one. They are a well-stocked store with loads of great baby things, and trust me, you can easily get carried away in there!

As my son grew, my time in Mothercare also grew. That's the beauty of Mothercare - you can still shop there when bubs gets bigger. There are educational toys, activity toys for all ages, clothes for toddlers and older kids, shoes, books, swim gear and so much more. When I was living in Sydney, I too, visited Mothercare a fair bit, and now that we are back in KL again, I don't know what I'd do without my favourite store. 

This 6th of May at the Suria KLCC store, Mothercare is celebrating their 25th Anniversary in Malaysia with loads of fun and games for all! There'll be play time, activity time, face painting, fairy princess dress up, costumes, magicians, cake time (what's a birthday without a cake?), and plenty more. Please see below for the e-flyer.


I also hear that Mothercare is not doing so well in the UK, sadly. With the growth of internet shopping in the UK, there really is not much necessity for physical stores anymore. Reports have shown that 1 in 3 Mothercare stores will close by 2015, which will leave hundreds jobless. 

But here in Asia, Mothercare is thriving more than ever! From the humble beginnings in 1997 at their first store in KL Plaza (now known as Farenheit 88), to 9 more stores across the country. If you would like to continually support them, please do come down to the celebration, and let's hope for another great 25 years in Malaysia!

Sunday, April 29, 2012

Red Velvet Cupcakes

The original Red Velvet cake is most well-known in the United States, from the Waldorf Astoria Hotel in New York. It's essentially a light, moist cake, with a touch of cocoa, and has a deep red colour. The original recipe was actually made with a buttercream icing, but in the Southern parts of America, it's made with cream cheese icing. Here in KL, the cream cheese version is most popular, and it became very trendy over the last few years. Almost every cake shop in town, have their own version.


I've been searching for the perfect (or close to perfect) Red Velvet cupcake recipe for awhile now. And came across a butter versus oil debate on the internet. It is better to start with a creaming method of butter and sugar first, or an all-in method with the addition of vegetable oil as the "fat" content?

The hard work was already done for me by a blogger named Baked by Jen, where she had baked the 2 different versions and photographed them as well. She had very interesting results with 2 different tastes and textures, of course. She concluded that the butter-based cake had superior taste, however the oil-based cake had a better crumb and also rose better, with a higher dome.

A few months ago, I decided to try a recipe from my Magnolia bakery cookbook. For those of you who haven't heard of the Magnolia Bakery, it's an old-fashioned cake store in New York, made famous by the Sex and the City series. This was a butter-based version and I thought it would be delicious, given my findings.

The results were quite disappointing, really. I tested it out on the family, and they weren't impressed. The cake itself was dry and when refrigerated, it became even more solid and tasted very bland.


So, determined to give the Red Velvet another go, I went back to the Baked by Jen blog and decided to experiment with her recipe.


Instead of just using butter, or oil, I decided to COMBINE the 2 different fats together, to get the best of both worlds.


So here's the adapted recipe, with my minor change.


Red Velvet Cupcakes
Makes 24 cupcakes


2 1/2 cups cake flour
2 Tbsp good-quality cocoa powder
1 tsp salt
1 tsp baking soda
1/2 cup butter
1/2 cup vegetable oil
1 1/2 cups sugar
2 eggs
1/2 teaspoon red gel-paste food colour, or red liquid colour to desired colour

1 cup buttermilk
1 tsp vanilla extract

1 tsp vinegar


Preheat oven to 170C.  Line 2 muffin baking pans with 24 standard size baking cups.


Sift dry ingredients together and set aside.

Place butter and oil and sugar in bowl of electric mixer and beat at medium-speed until light and fluffy, about 5 minutes. Beat in eggs, one at a time. Dissolve the gel paste into the vanilla. With the mixer on low, add mixture. Add vinegar.

Add flour mixture alternately with buttermilk in two batches. Scrape bowl and mix just long enough to combine. 

Pour batter into prepared pans and bake for 16-18 minutes or until toothpick inserted into the center of cupcake comes out with a few crumbs clinging to the toothpick.  Cool in pans for 10 minutes and then place on cooling rack to cool to room temperature.


Baking...waiting...waiting...
Cooling down....waiting...waiting...waiting...
All done! Beautiful light crumb, and also very moist straight out from the refrigerator.


The Red Velvet cupcakes are best served with your favourite cream cheese frosting recipe, once they have been completely cooled. You can spread the icing on with a spatula like what I've done here, or go fancy and pipe it into a swirl. 


Here's my favourite :


250g cream cheese, at room temperature
115g (1/2 cup) butter, at room temperature
2 - 3 cups icing sugar, sifted
1 tsp vanilla extract


Cream the butter and cream cheese together till smooth, scraping down sides to ensure everything is incorporated well. Beat for about 3 minutes. Add in vanilla and about 1 cup of icing sugar at a time and continue beating. Taste the icing as you go, until you reach of sweetness that you prefer.

Happy Baking! 


Friday, April 27, 2012

Cohiba Cigar Box Cake

I decided to start a blog mainly to share my craft, which is modern cake decorating. I figured I could snap a few "step-by-step' processes from baking, to ganaching the cakes, making the decorations and so forth. 

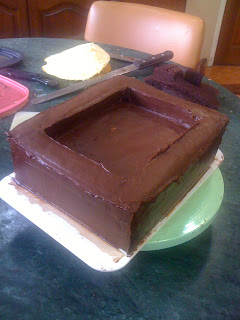
Hmm...I have one photo so far of a "work-in-progress" cake shot. Every time I remember to do it, either the cake has already been completed, or my hands are dirty and I can't be bothered stopping the momentum of getting the work done. 

I need to start getting into the habit of taking photos as I work, or else, this blog will be nothing more than a gallery of completed cakes! 

Boooooo-ring. 

Ok, so this week I had a task of making a Cohiba (very expensive Cuban cigars) cigar box. I was actually looking forward to it and I found a very elegant looking box online as a reference. Here it is :

I baked 2, 7" square chocolate cakes and cut them into a rectangle. Then I used the excess cake to cut into stripes and form a "wall" around the cake, to create a box. I ganached the sides and bottoms to secure the "wall". And it took around 45 minutes just to make sure everything was smooth and square. The insides of the box was the most time consuming as it wasn't easy getting into the corners! That's my only action shot of the cake making! Hahahaha, what a sad start to my cake blog!

Once everything was set, I iced the box in pieces. So the wood paneling went on first, followed by the black panels. 

The lid was pre-made using cardboard as the centre support system and I handpainted the Cohiba logo on the inner side. Wood grain was also added to the interior of the box to make it look more realistic.

The fun part was making the cigars. I went to my local grocery store and bought these old-fashioned cigar chocolate wafers. Then I rolled out brown icing really thin, and wrapped it around the wafers. Indents were made to make the cigars look like they were hand wrapped by skilled Cubans, and then Cohiba labels were stuck on.

All in all, a great looking masculine looking cake - which I actually enjoyed making! For all those who don't know me very well, I like making girly, pretty, cute cakes, and making manly cakes aren't my thing. However, this one was good fun! 

Here is the finished product.


You can also follow me on Facebook for more updates on this link

xx Thanks for stopping by!


Saturday, April 14, 2012

The Polka Dotted Sunglasses

My friend L and I, have known each other since Form 1. If my memory serves me correctly, that will be since 1988. That's right - 1988!! So what's that? 2012 - 1988 = 24 years! Unbelievable!! We were just talking at dinner the other night, that it MUST be a mistake. The millennium years have all been a blur, and it almost feels like it never existed. We feel like we are still in our twenties, and approaching the big 4.0 soon, is JUST not possible. 

Anyway, it was her birthday the other night, and we celebrated with an amazing Thai dinner at Celadon@Pavillion. It was a lovely gathering of L's nearest and dearest, with a few who could not make it, unfortunately. Nevertheless, it was a fun-filled night with lots of good food, wine and most importantly, great company.

For L's cake, I tossed around a few fashionista ideas like handbags or shoes, pretty pink colours, and all the things she loves most. Then a week before the party, it suddenly struck me - L had these really cute black and white polka dotted sunglasses by Lulu Guinness. It was perfect. 

I'll put it on her cake! Not many people can carry off sunglasses like those, but L certainly can! So I got in touch with her partner, R, and immediately he emailed a couple of photos of the sunglasses, on the sly.

He also included the case that it came in. And it was so pretty. I loved the design and the pretty lilac and white stripes. Easy-peasy. A cake design was right there before my very eyes. 


So I began work immediately. The sunglasses were constructed first, out of black gumpaste in 3 separate parts, and left to dry for a week. Then it was just a matter of cutting out tiny white polka dots and sticking them all over. To get the "shiny plastic" effect of actual sunglasses, I brushed on cold mirror gel all over and left it to dry. 


When the cake all came together, I was so pleased with its results. I couldn't wait to take it to the party and see L and R's face!

Here are a few snippets from the party, as well as the inspiration behind the cake (stolen from R's FB page, I hope you don't mind)! Shame on me, it only occurred to me after the party that I should have taken lots of photos of the party and food, to contribute to my new blog! 


Birthday girl blowing out the candle

There's L with them on (doesn't she look fab?), with her partner, R.

The girls, plus their offspring (that's me, on the left, sitting down) :)

Ze Cake!

Ze original sunglasses and case.


I hope you had a great birthday weekend, Liz! x

Thursday, April 12, 2012

The first ever, post. 12 April 2012

Today marks the day where I begin the journey of blogging. I've been toying with it for awhile now, but never got around to it. So, it's always better than later, and here I am today. There's a lot to learn and discover about blogging, but that's ok - it'll be fun. I enjoy reading blogs and also, am in awe at the commitment that it takes to maintain a blog.

So, this is my start to commit and to dedicate myself to my readers, to keep my blog interesting and regularly updated.